My Blog List

See Me Sew

Welcome to my little space! Let's share our things we cherish

Thursday, April 26, 2012

Needlework’s Enemies:Wool Moths and Carpet Beetles

Lately I’ve been about ready to scream over certain pests in my craft room, and I’m not talking about my dogs, who enjoy roaming in and rifling through my trash can to pilfer whatever, or get into my poly fiberfill, plucking it from its bag like so much cotton candy. I’m talking about those tiniest of pests, wool-eating moths and carpet beetles:

(Below, l to r: Carpet Beetles & larvae, Wool Moths and larvae and eggs)

carpet beetle and larvae                            moth egg pupa adult

It doesn’t matter *how* many times I fix a hole, re-stitch, or tuck in a seam, if I have a moth or beetle problem, and I don’t get that fixed, it’s a problem. For one, it means more hours of work. But I don’t want to send anything out of my craft area that may be infested with something, either.

And how did these bugs get there in the first place? It’s hard to say, since I stockpile natural fibers to use in my repair work.

wool threads

I’m always adding both new and vintage yarns and threads. And the repairs themselves may come in with pests in them that we don’t know about. After all, they’re coming to me due to holes or tears, rips or loose threads, etc,… That could spell “moth trouble” and such.

But why would anything stick around here, when we’re on a routine pest control by a reputable bug service? Well, because they’re resistant to a lot of the commercial sprays that get bigger bugs. And they hide. And sprays are not the be-all, end-all answer.

The thing about wool moths and carpet beetles is, first of all you may not even know if you really have them because they’re so small. AND they only like to be out at night (little vampires, sucking on my wool in the dark!) So how do you know if you’re a victim? Check your sweaters or your wool needlework, or (in the case of the beetles) your oriental rugs or wool carpeting. See any holes or missing threads? Then you’ve probably got an issue. Some recommend putting out moth traps, which look like regular fly traps. Hang them in a “suspect” room and see what you catch. You may be amazed.

Do you own pets? Then you’re more likely to have wool moths or carpet beetles. They like to munch on organic substances like pet hair, too.

pets

Do you vacuum regularly? That helps keep the population down.

Another reason they’re hard to get rid of is, there are 3 stages of the pests: 1) egg, 2) pupae or larvae, 3) adult. You may not see them at various stages. I recently saw a carpet beetle. Couldn’t tell with the naked eye if it was actually a beetle, but it was tiny and it was moving, and I looked up “beetle that eats wool” since it was near a repair project, and yep, I *hadn’t been* crazy, something HAD been taking out more of the wools on the project even as I worked on repairing it. GRR!!

So much for learning about them. I *have* them. So now that I know that, how do I get rid of them. I began Googling furiously, hoping for a quick fix for a big problem. I’d already been worried about getting any type of pest in my craft room, since I regularly take in other people’s projects + own a lot of vintage yarns + am always bringing in more fibers, and especially tasty wools. Recently, I’d even purchased a big Ziploc bag full of wonderful, fragrant dried lavender blooms, which I’d made into little sachets and placed on and around anything with wool or silk in it. But the professional response to this homeopathic moth/beetle repeller was shot down by just about everyone. Same with cedar. Sigh. At best, most experts said, these easy-to-find, natural fixes won’t work on really hungry pests, they’ll only deter a few of their friends.

Best advice was to wash the items in hot water, then seal them in something with really good seals like a Rubbermaid tub. Next, vacuum the room regularly (to get rid of any eggs or pupae around) and then use the moth paper or a fly paper with wool or hair stuck to it for attracting beetles and see if you’d gotten everything. They said to repeat this process every so often, since eggs can hatch and the cycle start all over again.

Ugh!

This is not great news. I cannot wash most vintage and antique pieces because the dyes will run. I can’t risk that.

Finally, after much research, including reading many customer reviews on the usefulness of any of the specific control products out there, I sent the hubby to Home Depot for a simple Raid fogger product that kills household pests, leaves no residue, and specifically states on its label it kills black carpet beetles and moths.

Raid Concentrated Deep Reach Fogger, 4 ct

We followed label directions and fogged, then waited 4 hours. Then we aired out the room. We’ll repeat this two more times, or whatever I go back and review online, I forget the specs, but we’ll do whatever it takes to make sure nothing else comes back.

The Dog Ate my Needlework!

A woman from CA emailed me to ask if I could repair a needlepoint pillow that a puppy had chewed. She sent photos, I replied with an estimate, and she then told me that my repair would be a surprise for her employer, 1940’s era movie actress Joan Fontaine (Rebecca, Jane Eyre):

Joan Fontaine Picture dog damagefront dog bite

(above photos showing damaged pillow backing and cording + bite out of needleworked piece)

Ms. Fontaine had worked the needlepoint herself. I looked her up and discovered that Vanity Fair had done a somewhat recent article on her (2006.) She is still beautiful, with lovely pulled-back silver ponytail and statuesque posture. She’s now in her 90’s, and continues passionately helping dogs through the ASPCA. With 5 of her own fur babies, it’s no wonder a few household items get gnawed on. The one who ate her needlepoint pillow was a 1-year-old German Shepherd rescue. I can totally relate, because I have an Aussie cattle dog rescue, a lab/pit rescue, and two cats.  Winking smile

I always love getting to know my customers and hearing them tell about their treasured items they’ve brought for repair, and this client sure was a special one. I emailed back to Ms. Fontaine’s assistant to say that Rebecca is one of my all-time favorite movies. She plays a beleaguered new bride with a husband (Sir Laurence Olivier) whose ex-wife casts a pall over everything. Even from the grave, she seems bent on ruining the present and future for the new Mrs. DeWinter. It’s classic gothic DuMaurier novel, set to film by master of suspense, Hitchcock.


Isn’t she beautiful? And what a theatrical pose! Definitely shows humor, and I suspect self-deprecation as well. Looks as if the dogs were refusing to ham for the camera.

My work began with much cutting of fabric. Then I sat down to repair the needlepoint. I didn’t have a perfect match of blue for the background, but some vintage yellow I own was bright enough. My purchased canvas was a wee bit smaller squares per inch than what was originally used, but nevertheless I cut a square and put it under the original. Then I worked through both layers and after a while, I had it all re-stitched.

pulling back of damaged threadsstitching through two layersalmost completed re-stitching

Once I’d hand-stitched the bitten area, I went about the task of cutting out new velveteen for the casing, creating the piping, etc:

 showing dog bite finishfront with sides onfront and back

And finally, Joan’s pillow is revamped:

joan f pillow finish

Thank you, Joan, for your business, for your caring for animals Dog face, and for the incredible talent you shared with the world. Red heart


Saturday, January 21, 2012

Needlepoint Repair: Family Crest

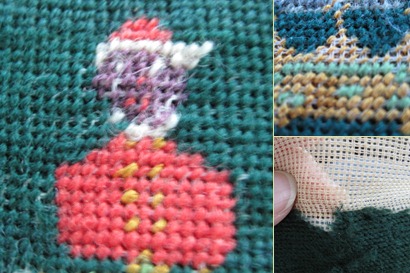
My client had a small, framed needlepoint family crest that he wanted repaired. When I received it, I could tell that there had been some damage over the years from heat or sun—the two usual culprits. Much of the wool on the front of the piece had become sparse, especially where the piece folded over at the edges for framing:

IMG_4639

The background was a dark green. I happened to have a good-sized hank of the color. Still had to purchase another hank, plus use yet another that I owned. It took a LOT of stitching all over the background to get it to looking full again. Plus, I wanted to fill in well on the edges, in case the client wanted to frame a slightly larger amount of it:

Once I had the background filled in, however, I was able to return the jocket atop the crest to its original color and also to reinforce all the other crest details with new matching threads. The only thing I didn’t touch was the red, as I didn’t have that color and could not find it. The color was still vibrant and in good shape, too. Here is the finished product:

IMG_4843

and here are some other shots of finished work:

IMG_4845        IMG_4847

Things I made over Christmas 2011

I managed to make one ornament. I usually knit or crochet something for the tree. This year, I made one from a shared online freebie pattern:

IMG_4547

Pine cone! I love how it turned out. I would say it was easy, but it wasn’t! Oh, well. It also hurt my hands, making it with the thread and a small hook. I think it was a size 7 hook, and 10 cotton. This cotton was given to me by a nice customer, Gayle. Thanks!

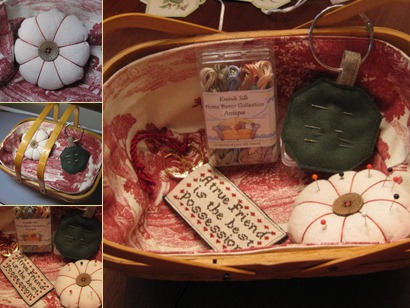
Then I made my friend a sewing basket. Well, I thrifted the basket. I wanted on that had handles so she could tote it around her house. We often do Friday sewing days, and she carries her sewing from the basement up to the kitchen. Everything was made from free online tutorials, etc,… However, I had a *bear* of a time with the basket liner, so it’s more of an “on my own” thing. I followed two tutorials, and they didn’t work for my shape of basket, so ended up taking little tucks in the sides and it fit just right. Third time was a charm! Whew!

What I Do in My Free Time

I learn something new! Upholstery class is my latest lesson. Yep, that’s what I do for fun and to save money (but lose blood)--I work on my own furniture. In typical fashion, I began my upholstering odyssey with THE hardest thing for even seasoned craftsmen to do: tufting.  And not just any tufting, but a tufted double ottoman with 18 buttons. sigh

Before I even show you the piece, let me tell you, this is one of the hardest things I’ve ever done. I have some arthritis setting in that I refuse to acknowledge, and removing hundreds of staples from this very well-made piece in order to “break it down” was killer on my hands. I also, at one point, sported 4 Band-Aids. Yes, there IS a reason why you usually see male upholsterers. And how much did my husband help? Well…he puts the ottoman in the car for me, if he’s home. He never took out one staple. He never even offered. Not that I blame him, but there *is* a husband in our class, helping his wife every single week.

Anyway, here is the ottoman “before,” while it has doggie hair and dirt on it and where you can see my Australian cattle dog bit some buttons off, back when he was a pup. What you can’t see from my photo is that this is forest green, burgundy and cream. I’m trying to do a more updated color. As the story continues, just about everything went wrong with finding my fabric!

IMG_4406

So, the fabric I chose was this (below) but you can’t tell it’s more of a light gold with, again, the green and burgundy:

IMG_4597

I LOVED this fabric and it was $15/yd from the discount place. Got 5 yards. Began breaking down my ottoman:

I don’t have photos of the stripped-down piece, but to continue my sad story, once I took it to class, we figured out the fabric wasn’t wide enough (ottoman is longer than 54” fabric width) AND the pattern ran in one direction, like wallpaper. That meant that if I “railroad” the pattern top to bottom all around like I’m supposed to, the pattern would be upside-down in the back. Now, for some people, that might work, if the piece goes up against a bed’s footboard or something. However, this is extra seating for my den, so it sorta needed to be correct.

Solution: use that fabric on my 2nd upholstery project, which is another really difficult piece, a chair with channeled back and piping!

By the way, each class is 3 hours, takes 4 classes and costs $195 total. Fabric was sort of purchased twice. I don’t think I’m saving much money, do you? LOL

I think a good part of why it’s hard is because I’m not that good at workshops. The course is done “round robin” style, which means you have to wait until the instructor comes back around to you for further instruction. I’m not very good at waiting. I’m always ready to move on. Anyway, here are some photos of the piece as I work on it. I have the welt cord (piping) on now, so the only remaining step is to replace the padding and stapling of the bottom. I cannot WAIT to finish. I do this on Sundays from 3-6PM, which I probably already said was a hard time of the day for me. I’m always tired by 5, and by 6 I’m pretty worthless! (which makes crock pot dinners great for me!)

And here are a few final photos of the class and my piece, which lacks only the very bottom.

Monday, January 16, 2012

Baby on My Doorstep!

One day in December, I came home from church to find this on my doorstep:

IMG_4689

A baby in a basket, with a Band-Aid on her eye! The note with her was from a dad, and it said I’d spoken with his wife about fixing his daughter’s doll.

Indeed, the girl’s mom had phoned me earlier to ask if I could fix her “Jackie.” Her daughter had accidentally poked the doll’s eyes in, and now she thought she looked a little scary. You be the judge:

IMG_4693

So I set about seeing what we had to work with here. First I had to remove the head to see how the eyes were set. I had already old my customer that I wasn’t sure I could do this repair, as I hadn’t set eyes in a vinyl head before. Have only set rocker eyes in antique (bisque) dolls, which is done with plaster. The customer was willing to let me give it a try, though. As I removed the head, this is what I found:

There was a cloth bag inside (see large photo above) with plastic pellets in it giving the doll some weight. I removed that and then removed the head from the neck piece. With a flashlight, I could see that the eyes were set into sturdy vinyl sockets. Now what to do? Cut them open and take out the eyes, fix and then re-pour plastic/vinyl/silicone?

After doing a little research, I discovered one technique used with dolls like this is to heat the eyes with a hair dryer, then pop them out from the front. Worth a try, and here is the result:

IMG_4711          IMG_4712

The eyes were set into a metal rim that rested inside a black plastic “socket.” The eyes were actually broken when the owner pushed them into the doll’s head. Tiny“rocker” notches sitting into holes in the black socket cup had been snapped off. No choice for me, then, but to re-set the eyes in a stationery position. No more rocking open and closed for her.

One eyes went back together all right, as it wasn’t as broken. But the other one would not stay *up* in position, and fell down into the socket cup. So I came up with the idea of propping it up with a fabric-and-epoxy composite:

IMG_4714        IMG_4713

I shredded this monk’s cloth to make my mixture, and then stuffed the socket cup and reassembled the eye. It worked!

Once I had both eyes fixed, after they dried a while I used the hair dryer to heat up the doll’s eye holes again. Then I popped them back into her head. After a little positioning (two attempts on one eye) Jackie was looking good! I put her pellet weights and stuffing back in, gave her a new string tether for her neck (the cloth body is tied on at the neck) and took stitches at her neck where I’d loosened the body. After washing and brightening her layette and outfit, she was ready to go home, not looking a bit scary. Mission accomplished!

 IMG_4770IMG_4771

Upholstery Update

Well, this class is HARD! I think a good part of why it’s hard is because I’m not that good at workshops. The course is done “round robin” style, which means you have to wait until the instructor comes back around to you for further instruction. I’m not very good at waiting. I’m always ready to move on. Anyway, here are some photos of the piece as I work on it. I have the welt cord (piping) on now, so the only remaining step is to replace the padding and stapling of the bottom. I cannot WAIT to finish. I do this on Sundays from 3-6PM, which I probably already said was a hard time of the day for me. I’m always tired by 5, and by 6 I’m pretty worthless! (which makes crock pot dinners great for me!)